Thursday, 24 August 2017

Tilt-Shift Photography (Without the Expensive Lens)

Tilt-shift photography comes from the use of a tilt-shift lens, which has a number of uses such as architecture photography where it can fix perspectives.  My only experience of using one was a PC-E NIKKOR 24mm F3.5D ED mounted on a Nikon D700 which I borrowed from my college in order to fulfill an assignment. The most commonly known use for a tilt-shift lens is to create a miniature or toy-town effect.

Unfortunately, tilt-shift lenses can be extremely expensive and therefore out of my budget which currently stands at £0. However there are several cheat methods including a Photoshop filter and a website that can do the same effect.

This is a tutorial for an image that I created as part of my HND Photography using a method that creates a tilt-shift effect.

For this tutorial you will need a n image that has been shot from a downward angle such as this landscape of the city of Gdansk that I took on a family trip to Poland.

Step 1) Using the RAW filter, provided that you did shoot the original image in RAW, if not then you can adjust the colours and contrast using the Photoshop Adjustment Layers. 
 I boosted the contrast right up and the saturation for the toy-town effect.

Step 2) Press Q and enter the Quick Mask selection
  Using the quick mask, select the gradient paint bucket tool and drag a line starting from where you would like to be sharp within the image. 

 Press Q again and exit the Quick mask and this will have created a selection.

Step 3) Open Filter > Bur > Lens Blur... and use the dials on the filter to adjust how much blur you want int the image.

(Optional) Step 4) 
I used the different adjustment layers to boost more of the colour and contrast to give a more surreal look to the image but then a colour cast was created so I used the colour balance to adjust this.

And that is how I created the Tilt- Shift Effect.

I then added a hand with a paintbrush and some paint drops to create my final image.


Tuesday, 19 July 2016

Using Layer Masks in Photoshop

One of the most basic parts of Photoshop is layer masks. They are very easy to use and literally will take you 2 seconds to grasp the concept.

Photoshop uses layers to edit an image and those layers can have their opacity adjusted. A layer mask allows you to have more control over the opacity and even only use parts of the image. 

To use layer masks, you'll need at least one other layer. I have gone for three siilar images of roses that I have taken. 

 I arranged the images slightly. You can lower the opacity down in the layers panel to do this as well to help you see where the images will lie.


 To add a layer mask, select the layer you would like to mask and click the white rectangle with a black circle button at the bottom of the layers menu. 
 This will add the mask to the selected layer which shows as white meaning the layer's opacity is 100% and therefore fully visible.
 To lower the opacity in parts of the image, make sure that the black colour is selected and use the paintbrush.
 Start with a low opacity on your brush so the edges are feathered and not a straight cut which can be distracting.
 Once you paint out the parts of the image, black will appear on the layer mask showing that those parts of the image are no longer fully visible.
 Here is the image after I added the layer mask.
 I added another layer mask to the third image.
 And this is my final edit.

For more about the different blending modes when using layers, see here.

Monday, 18 July 2016

Why RAW is better

When I began photography, with my tiny little compact, I always tried to get my images to be the best quality. This meant jpeg fine usually which is ideal for amateur photographers. However I have met proffessionals who use jpegs for various reasons.

When I began the HNC Photography course, we were introduced to RAW images, or digital negatives. As we used mainly used Nikon cameras we used .NEF, however the Canon equivalent is .CRW.


Pros

The quality is so much better. Jpegs lose file information every time the image is opened, where digital negatives don't. RAW files are described as non-destructive so it does not compress the file.

The control you have within the image is a lot better with RAW than with a jpeg image, although you can use the Camera Raw Filter on Photoshop to adjust jpegs, however it will not be as superior quality. The digital darkroom work is done within the camera for a jpeg image, however if the image is over or under exposed, the detail can be be saved within a RAW image, but not a jpeg.

Cons

Obviously there are a few cons about RAW which I should mention. The files must be edited using certain software. Adobe products are all suitable for RAW editing, however they can be quite pricey. Picasa, a free program created and owned by Google that is similar to Adobe Lightroom.

Another downside to this, is that new cameras  such as my Nikon D5500, do not create photoshop friendly files. I had to download the Adobe DNG Converter just to be able to view my images in Lightroom.

The file size is also incredibly large in comparison to jpegs which if you are doing a large shoot and don't have a spare memory card, it can be quite tricky to fit all the images on your memory card.

Thursday, 14 July 2016

That Snapshot Aesthetic (How to shoot like Terry Richardson)

Terry Richardson is one of my favourite photographers.

Say what you want about the man and all the controversies around him, but you can't deny the man knows how to photograph people. He knows how to shine someone's personality through an image and using such a simple set up, he creates such a high energy image. 


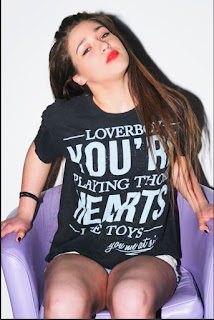
As part of my HND Photography course, we were required to do a fashion photography module. And as part of that we had to do 4 different shoots. My first shoot was about printed t-shirts, I used my band t-shirt collection, and I adopted Richardson's technique.

With a bit of help from ilovehatephoto.com and www.diyphotography.net, I worked out what I'd need for my shoot. The DIY Photography used very similar equipment to what the college had available to me. Both sites suggested a prime lens, however I used my kit lens instead as I wanted to use the zoom on it. I used my Nikon D5500 and I borrowed a Nikon SB-900 Flashgun from the college. I used the college studio's white wall as a background. The flashgun is attached to the camera and that is the most basic lighting set up ever. I set my camera to f/8 and had a shutter of 1/200sec. 

As I mentioned in my previous post, I used my friend Weronika as a model. Whilst doing the shoot, I kept my Pinterest board open so we could see poses and how we could replicate the images, not only by Richardson but by Juergen Teller as well. 


I really enjoyed doing this style of shoot and I am very keen to do a similar one again soon. Just need to find a model and a location and buy myself a flashgun first. 


Tuesday, 12 July 2016

Etsy Shop Up and Running

Today, I got rejected from a job that I believe would have been perfect for me and it was actually related to my HND, however these things happen, I guess.

In order to do something productive and stop me from feeling so down, and also help with the fact that  I am flat out broke, I decided to finally launch my Etsy shop, where I will do commission based work such as photo montages and name collages. I will be updating the shop as I find new things to create and also I will be putting up some of my photographs that will not be available via my metro imaging site.

I decided to use the name Bekah Kate Photography to keep the shop a bit separate from my print shop.

If you would like any of your images edited, retouched, compiled into a collage etc, please feel free to email me at rebekah13rogers@hotmail.com and we can discuss things.

Monday, 11 July 2016

Selling My Images (A shameless plug for me to get your money)

So for those who may keep up with my blog, I literally do not think that's even one person, you may have noticed that I have updated my site quite a bit. Although it still needs a bit of tweaking as I am not a web designer, it's getting there slowly.

So with a bit of googling, I found a website called Metro Imaging which allows me to sell my images within a small gallery on my blog. It does also offer the option to have a stand alone page, however, I did not want to redirect from my site so I used the embed code and added it via the HTML edit option on the Blogger page.

The site is very easy to use and upload images to, with the option of creating categories to help organise your images.

Please feel free to browse and I will be uploading more images so hopefully there will be something you like :)

Friday, 8 July 2016

Highlighting and Contouring (Via Photoshop)

Highlighting and contouring is a massive trend within the beauty world. I do it myself. I have a big nose and no visible cheekbones, so I like to draw them on.

This can easily be done within Photoshop.
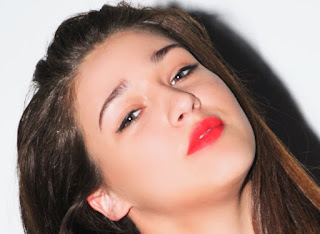
I used this contouring method on these two images and I will now demonstrate how to use it. It was originally shown to me as a way of retouching skin.

This is the original image after the high frequency separation was applied to smooth the skin and remove blemishes. All these images are images I took myself as part of my fashion unit, in which I recreated Terry Richardson's snapshot aesthetic and used my beautiful friend Weronika as a model.  I used a flashgun attached to my camera as a light and it was such a fun shoot to do.


Step 1) After opening your image and retouching the skin and editing it however you want, go to Layer > New > Layer...
This box will then open up. As you can see I renamed it "Highlight/Contour." Set the mode to "Soft Light" and click the "Fill with Soft Light neutral color" box. Then click OK and this will create a new invisible layer on top of your image.
So we will be using this layer from now on, so ensure that it is selected.


Step 2) Select the dodge tool and set the exposure to 7%. And this is what we will use for the contour.


Step 3)  Just as though you were applying a contour crayon to your face (if you hae never done that, then look up a makeup tutorial), pick the areas of the face you would like to darken.
I wanted to make the jawline more prominent as the flash had washed it out. 

Step 4) Once you've completed your contour, switch to the Dodge tool and set the opacity to 7% again.
Step 5) So basically repeat the previous step, however this time, highlight the areas you'd wish to lighten.
I highlighted the dark circles under the eye and went over the cheekbones (as if I was doing my makeup), however unlike using real makeup highlighters, you can use the dodge tool to brighten dark blemishes on the skin.


And that's all there is to it.