So as you may know, I have been studying photography at college for the past 3 years and last Thursday, I officially passed.
This story begins back in 2013, when I completed my first year at Aberdeen College, where I did Highers. I had no idea what I wanted to do, so I decided to do photography as I'd always been interested in it. Due to my pretty poor school grades, I went for the NC level photography course. I applied for the course and went for an interview. I was given an unconditional due to the fact I had standard grades.
The NC course gave us a basic knowledge of different camera techniques, Photoshop and film photography. They have since changed it so it includes mobile photography and video. I'd recommend doing an intro course as it helped our understanding, especially within the darkroom environment.
After passing the NC course, I was given a conditional for the HNC course which would be the first year of a two year course. Then I'd move onto the HND course. Another reason why I'm glad I did the NC course beforehand is because I was unaware of how big the step up from NC level wok to HNC work is.
If you want to begin a higher education photography course, or any course, I'd recommend it. Qualifications are qualifications and having them proves that you can work towards something. I am aware that many countries and students are not granted the same experience that I was, due to funding. I believe education should be free for all, however this is not a political blog
I did enjoy the course and I'm glad I continued it. I do believe I should have worked harder and not let myself get so distracted by personal issues.

Monday, 4 July 2016

Monday, 18 January 2016
Photography Survey
So for my business class we have to do a plan and we need surveys filled out, so if everyone who reads this blog and my tweets could do me a massive favour and fill this survey in so I can pass my course.
And I will have some major news coming up in the next few weeks and I will be getting back into tutorials and posts very soon once I've caught up with college work.
Thanks :)
Bekah
And I will have some major news coming up in the next few weeks and I will be getting back into tutorials and posts very soon once I've caught up with college work.
Thanks :)
Bekah
Friday, 18 December 2015
Christmas Ideas for the Shutterbugs in Your Life
There's a week to go until Christmas so everyone should have done their shopping by now, but if you haven't here's a list of what's most wanted this year photography wise.
Cameras
I cheated and treated myself to a Nikon D5500 earlier on in the year, which I highly recommend for those on a student budget. It work fantastically in low light, showing little noise even with a high ISO, however I don't use the touchscreen as much as I thought I would have (especially now I have acrylic nails).
The next one down from the D5500 is the Nikon D5300 which is similar to the D5500, however the body is slightly different and the screen isn't a touchscreen.
The Canon equivalent to the D5500 is the Canon EOS 70D which has a similar picture quality and price tag.
If a DSLR is a bit pricey for a Christmas gift, or, like me, you have just bought one, then maybe go for an instant camera like the Fujifilm Instax. Amazon have a cute little bundle offer here.
If you or someone you love and are willing to spend some money on are a sports enthusiast as well as a budding photographer, get them a GoPro.
Accessories
Get your loved ones memory cards.
Or a hard drive.
For years I've wanted a Joby GorillaPod. If you've never seen one, it's like a tripod, however the legs are fully moveable and the tripod can even be wrapped around objects.
Another camera item I have always wanted is a Lensbaby. There are several different types of lensbabies and each has a different effect and level of control, they even make ones for iPhones. They also have some accessories, such as different shaped apertures and different optics.
If you're looking for a cheap, but thoughtful gift for a camera enthusiast, go for a patterned camera strap. Most photographers keep the same one that came free with the camera, however adding a nice colourful one will make your camera feel more personalised and can stop it from getting mixed up with another camera. I have a pink neoprene one which helps with the strain a camera can have on your neck.
You can't go wrong with a camera bag either. Most camera bag designs just look like well camera bags and aren't the most attractive thing ever, but they protect your camera. However, someone heard my prayers and they've began making really pretty ones like this satchel, this one which has removable padding and can become a leisure bag and this one.
A still life fanatic would appreciate a portable mini studio and a landscape photographer may like a rain cover
And if you're really struggling with ideas: a cleaning kit.
Or a selfie stick. If you want to be beaten with it after opening.
Photobooks
I do appreciate a good photobook or one that can give me ideas and help me improve my photography.
For £99, you can get a first edition of Kirsty Mitchell's Wonderland book.
Another of my favourite photographers, Miss Aniela has two very interesting books, on on self-portraiture and one on creative portraiture. I have both those books and they are very informative and have extremely fascinating images.
And for the wildlife lovers, the annual Wildlife Photographer of the Year book is out now.
Merry Christmas everyone :)
Cameras
I cheated and treated myself to a Nikon D5500 earlier on in the year, which I highly recommend for those on a student budget. It work fantastically in low light, showing little noise even with a high ISO, however I don't use the touchscreen as much as I thought I would have (especially now I have acrylic nails).
The next one down from the D5500 is the Nikon D5300 which is similar to the D5500, however the body is slightly different and the screen isn't a touchscreen.
The Canon equivalent to the D5500 is the Canon EOS 70D which has a similar picture quality and price tag.
If a DSLR is a bit pricey for a Christmas gift, or, like me, you have just bought one, then maybe go for an instant camera like the Fujifilm Instax. Amazon have a cute little bundle offer here.
If you or someone you love and are willing to spend some money on are a sports enthusiast as well as a budding photographer, get them a GoPro.
Accessories
Get your loved ones memory cards.
Or a hard drive.
For years I've wanted a Joby GorillaPod. If you've never seen one, it's like a tripod, however the legs are fully moveable and the tripod can even be wrapped around objects.
Another camera item I have always wanted is a Lensbaby. There are several different types of lensbabies and each has a different effect and level of control, they even make ones for iPhones. They also have some accessories, such as different shaped apertures and different optics.
If you're looking for a cheap, but thoughtful gift for a camera enthusiast, go for a patterned camera strap. Most photographers keep the same one that came free with the camera, however adding a nice colourful one will make your camera feel more personalised and can stop it from getting mixed up with another camera. I have a pink neoprene one which helps with the strain a camera can have on your neck.
You can't go wrong with a camera bag either. Most camera bag designs just look like well camera bags and aren't the most attractive thing ever, but they protect your camera. However, someone heard my prayers and they've began making really pretty ones like this satchel, this one which has removable padding and can become a leisure bag and this one.
A still life fanatic would appreciate a portable mini studio and a landscape photographer may like a rain cover
And if you're really struggling with ideas: a cleaning kit.
Or a selfie stick. If you want to be beaten with it after opening.
Photobooks
I do appreciate a good photobook or one that can give me ideas and help me improve my photography.
For £99, you can get a first edition of Kirsty Mitchell's Wonderland book.
Another of my favourite photographers, Miss Aniela has two very interesting books, on on self-portraiture and one on creative portraiture. I have both those books and they are very informative and have extremely fascinating images.
And for the wildlife lovers, the annual Wildlife Photographer of the Year book is out now.
Merry Christmas everyone :)
Wednesday, 16 December 2015
Free Photoshop Actions
So I've started making Photoshop actions.


These are available via my deviantart page here. Feel free to have a play around with them.
Tuesday, 15 December 2015
High Dynamic Range or HDR Photography
I've always been curious as to what HDR photography is, but I'd never attempted it until recently.
It's pretty easy once you grasp the concept of how to do it.
I took the images from the cinema using 7 images each with a 5 second difference within the shutter times.
 |
| Aberdeen, near Union Terrace Gardens |
You need at least 3 images. One with a normal exposure, one overexposed and one underexposed. (You can take a couple extra either side). The over exposure will get your highlights and the underexposure will get your shadows.
To take 3 identical images, you will need a tripod and a sturdy one at that. Adjust your camera to the light you're shooting in and take your normal image. Then up your shutter 2 stops and capture the next image for your underexposed image. Then put the shutter 4 stops down, so it will be 2 down from your original image.
 |
| Belmont Filmhouse, Aberdeen |
Once you have all your images, it's editing time. I used Photoshop, however it can be very slow to load but I don't have any other HDR software.
So in Photoshop, got to File>Automate>Merge to HDR Pro.. which will open a small menu and then select the images to open.

Friday, 27 November 2015
High Frequency Separation (Or the perfect way to retouch skin on Photoshop)
Been a while since I did a tutorial and I have been doing a lot of editing recently so I thought I might share since a few of my old tutorials are terrible.
So this is my original image taken as part of a fashion shoot that I did for some fashion management students and the final edit that I did as part of my Advanced Image Editing class.


And that should be you finished the skin retouching :)
So this is my original image taken as part of a fashion shoot that I did for some fashion management students and the final edit that I did as part of my Advanced Image Editing class.


- Open the image in Photoshop. If it is a RAW file, tweak it to how you want it to look.
- Duplicate the original layer twice

- Select the middle layer and go to Filter>Blur>Gaussian Blur...
- Using the Blur filter, zoom in on an eye and set the blur so the eye is just able to make out.

- Close the filter once you are satisfied with it. and select the top layer.
- Go to Image>Apply Image... This will open up a window with a few options.
- In the Apply Image menu, select the middle layer in the Layer drop down menu.

- Set the Blending to Subtract
- Set the Scale to 2 and the Offset to 128.
- Close the Window and set the top layer's blending mode to Linear Light.

- This will have separated the colours and the detail within the image. Select the middle layer again and apply a Quick Mask by pressing Q and using the paintbrush to paint over the areas you want to edit.

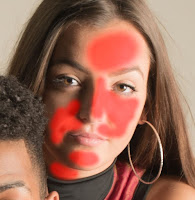
- Press Q again to exit the Quick Mask and then Ctrl + Shift + I to invert the selection and apply a Gaussian Blur to the selection.

- Then select the top layer and you will be able to sort any blemishes using the Spot Healing Brush Tool or the Healing Brush Tool (see here for a slightly in-depth tutorial on them)


And that should be you finished the skin retouching :)
Tuesday, 24 November 2015
How to Photograph Concerts (featuring Admiral Fallow)
As you may have seen in the last post, I got a photo pass to an Evening with Noel Fielding, which was absolutely brilliant. I did briefly mention in that post after I emailed every tour promoter and band manager for every gig in Aberdeen, that I got one response.
That was from Admiral Fallow's manager.
So I got to go to that gig for free :)
 Anyway, since I was a complete amateur to gig photography, but here are the tips that I was so glad I knew and also what I found out whilst undertaking the photoshoot.
That was from Admiral Fallow's manager.
So I got to go to that gig for free :)
 Anyway, since I was a complete amateur to gig photography, but here are the tips that I was so glad I knew and also what I found out whilst undertaking the photoshoot.
- Set up your camera beforehand. Although the lighting will change as soon as the band come on, you won't have time to be messing about with manual mode.
- Use a fast lens. The lighting is so low at concerts that a very low aperture is used since a fast shutter is necessary and you will not be allowed to use flash. I used a Nikkor AF-S 50mm f1.8, which is a good little prime lens. There are pros and cons of using a prime lens, the main con being the inability to zoom. However, it was a lot cheaper than any zoom sport lens that I could find. I got it used from Wex Photographic.
- Take as many shots as possible. Remember, you only have 3 songs. I wasn't looking at the back of my camera and I got several terrible shots which were just completely blurred, but I got a few good ones. The more shots you take the better chance you get of getting a good image.
- Find a good vantage point and don't be afraid to move to find a better one. I was zig zagging all around the place trying to find where was the best place.
- Use a high ISO, a fast shutter and as low an aperture as you can get away with and if you can, shoot in RAW (always shoot in RAW, it will change your life and photography, if you don't already.).


- I used Lightroom. I have barely used Lightroom in the past year, due to my love of Photoshop and all the things it can do, but Lightroom is much easier so simple editing and especially batch processing.
- Ever wondered why a lot of live music images are in black and white? Well that is because of the rubbish lighting and the noise and the fact that all that can be corrected by converting images to black and white. This also corrects any dodgy colours by removing them completely.
- Editing in black and white is so much easier than editing in colour as the noise is reduced dramatically and there are no colours that need to be corrected.
If you think your images would work better in colour, then keep them that way.
Subscribe to:
Posts (Atom)